
Why does a bathroom leak? 7 waterproofing failures that send you back to renovation, and how to avoid them
Damp that shows up months after the room is closed is almost always a waterproofing failure, not bad luck. Here are the seven common mistakes that send people back to tearing out a finished bathroom, and how a crew that works properly prevents each one.
Updated July 2026 · Nur Renovations
The short answer
A bathroom leaks almost always because of a waterproofing failure, not bad luck: no cove fillet at the wall-to-floor junction, a skipped flood test, tile adhesive instead of a waterproofing layer, the wrong slope to the drain, unsealed penetrations, waterproofing not carried high enough up the wall, or a poor bond between waterproofing materials. These failures stay hidden under the tiles and only surface months later, when damp appears and a finished room has to be torn out to reach them. All of them are avoidable with correct work: double waterproofing, a documented flood test before tiling, and a written warranty on wet work.
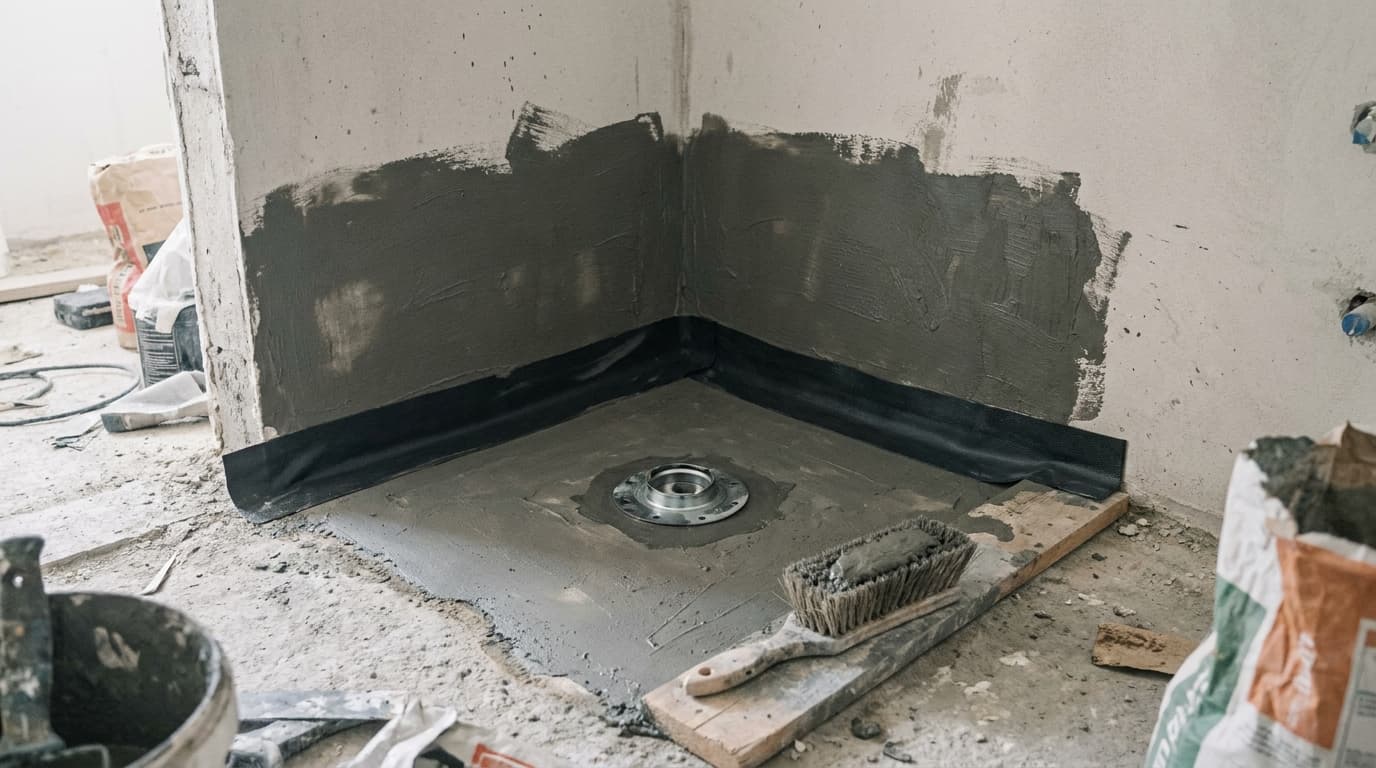
A bathroom is the wettest space in the home, and the hardest one to fix after the fact. Once the room is closed, with the tiles, grout, fixtures, vanity and shower glass all in place, any small waterproofing flaw left behind the tile becomes a problem that forces you to reopen exactly what you just paid for.
Damp almost never shows up the next day. It surfaces months after handover: a stain that keeps returning on the neighbor's ceiling below, grout that blackens, a musty smell that won't clear, or plaster crumbling on the adjoining wall. By that point you can't simply add another coat. You have to find the entry point, and usually open part of the room to reach it.
Nearly every leak comes from a small set of recurring failures, and all of them are avoidable with correct work. For us, waterproofing, plumbing and tiling are the core of the job, not an add-on to it. We work with double waterproofing, a documented flood test before tiling, a fixed crew, a transparent BOQ and a written warranty on wet work. These are the seven failures we see most, and how each one is prevented.
01No cove fillet at the wall-to-floor junction
The wall-to-floor junction is the right-angle corner that all the water in a bathroom drains toward, and it's the spot most prone to leaking. A waterproofing layer trying to cross a sharp right-angle corner stretches, cracks or pulls away from the substrate there, because it has no continuous surface to grip.
The fix is a cove fillet, a small rounded angle formed at the wall-to-floor junction before waterproofing, so the membrane runs continuously from floor to wall with no sharp corner. That gives you a sealed, flexible transition that doesn't crack as the structure moves slightly over time.
Watch out
When the cove is skipped, the waterproofing can look perfectly fine to the eye but fail along the line where the floor meets the wall. That's the hardest place to locate once the room is tiled.
02Skipping the flood test before tiling
A flood test is the only check that proves the waterproofing actually works before the room is closed. You seal the drain, fill the wet area with water, and confirm there's no drop in the water level and no damp underneath or in the adjoining walls. Tiling starts only after the test passes.
When this step is skipped, the problem surfaces only after the room is already tiled, clad and fitted with fixtures. At that point the repair is no longer a few-hour check but an expensive tear-out. For us the flood test is a documented mandatory stage, not something we do if time is left over.
Field tip
Ask to see documentation of the flood test: a date and photos of the room flooded before tiling. That's the simplest proof the waterproofing was tested, not just applied.
03Tile adhesive instead of a waterproofing layer
A common mistake, sometimes to save time and sometimes from lack of knowledge, is assuming tile adhesive also waterproofs. Adhesive is meant to bond the tile to the substrate, not block water. It doesn't form a continuous membrane, it absorbs water, and the grout joints between tiles aren't waterproof on their own.
Real waterproofing is a dedicated layer, a flexible cementitious material or a membrane or a combination of the two, applied or laid over the entire wet surface before tiling, including corners and junctions, to form one continuous envelope. The tile and grout are the finish and mechanical protection over the waterproofing. They are not a substitute for it.
04Wrong or insufficient slope to the drain
A bathroom floor should lead water to the drain with a gentle, continuous slope. When the slope is reversed, too flat, or wavy with local dips, standing puddles remain, and water that doesn't drain looks for another way out: into the grout, to the edge of the waterproofing, into the adjoining wall.
Standing water does damage in two ways. It accelerates wear on grout and waterproofing, and it sits long enough to find any small weakness left in the envelope. A correct slope is set as early as the screed stage, checked with a level, and planned so every point on the floor leads to the drain, per the manufacturer's instructions and the Israeli standard for wet-room waterproofing.
Field tip
A simple home check after a renovation: pour a little water on the floor away from the drain. It should flow toward the drain without leaving a puddle. Water that stops in place points to a faulty slope.
05Unsealed penetrations: drain, pipes, niche
The sealed envelope is continuous only up to the point where something penetrates it: the drain collar, water and sewage pipe penetrations, and sometimes a storage niche recessed into the shower wall. Each such hole is a weak point that needs dedicated sealing, meaning a sleeve or gasket around the pipe, a correct connection of the waterproofing to the drain collar, and full sealing of the niche floor and its slope.
The drain is the most critical spot, because all the water in the room reaches it in the end. If the waterproofing isn't correctly connected to the drain body, water seeps under the waterproofing instead of draining through it. A recessed shower niche is a classic damp trap when its base and slope aren't sealed like the rest of the wet area.
- A drain collar connected and sealed to the waterproofing layer, not just sitting next to it
- A dedicated sleeve or gasket at every pipe penetration through the floor or wall
- A sealed niche floor with a slight outward slope, so water doesn't collect inside it
06Waterproofing not carried high enough up the wall in the wet zone
Many people think of waterproofing as something that happens on the floor. But in the shower area, water hits the wall at considerable height, directly from the head and as spray, so the waterproofing has to rise up the wall along the entire wetted area and not stop low above the floor.
When the waterproofing stops too low, water hitting the wall penetrates above the waterproofing line into the plaster and the adjoining wall, and a damp stain then appears in the next room that looks unrelated to the shower. In the wet zone we carry the waterproofing up the wall to a height that covers the full spray range, per the manufacturer's instructions and the standard.
Watch out
A damp stain that appears on a neighboring room's wall, or behind a hallway cabinet, often comes from the shower wall on the other side, where the waterproofing wasn't carried high enough.
07Improper bonding between waterproofing materials, or rigid corners that crack
Waterproofing is a system, not a single product. When you combine materials, a cementitious layer, a membrane and a corner sealing material, they have to be compatible and correctly bonded to each other. Combining incompatible materials, or a poor overlap between membranes, creates a weak seam that opens up at the joint.
A related problem is rigid corners and junctions. The structure moves slightly, from thermal expansion, from vibration and from natural settling, and rigid waterproofing at an internal corner cracks along the line. So at corners and transitions we use a flexible solution, a dedicated corner tape or membrane, that absorbs the movement instead of breaking from it.
All of these failures are prevented the same way: working to one coherent waterproofing system, applying it per the manufacturer's instructions, and a documented flood test that proves the envelope really is continuous before it's covered with tile.
Official sources
Damp in the bathroom? Let's find the source
A site visit, a diagnosis of the entry point, and a transparent BOQ with a written warranty on wet work. No temporary smears, a solution that genuinely seals.
Site visit & quote