
Balcony waterproofing before winter: slope, drip edge and cove, how to do it right
A balcony is the most exposed space in the home: direct rain, sun, cold and structural movement. Most leaks that appear in winter, on the ceiling or wall below a balcony, come from a simple waterproofing failure that could have been handled before the season. Here is what to check and fix, and in what order.
Updated July 2026 · Nur Renovations
The short answer
To stop a balcony leaking before winter, first find where the water gets in, then choose between a local repair (cleaning and sealing the drain, repairing grout, treating the drip edge) and re-waterproofing the whole surface when the slope is reversed or the waterproofing has failed across the floor. Either way you need a continuous slope that leads water to the drain, a drip edge that throws runoff clear of the wall, a continuous cove at the floor-to-wall and railing junctions, and sealed drains and anchor points. All of it is done at the end of summer or the start of autumn, before the first rain, because the waterproofing and screed need drying time per the manufacturer's instructions.
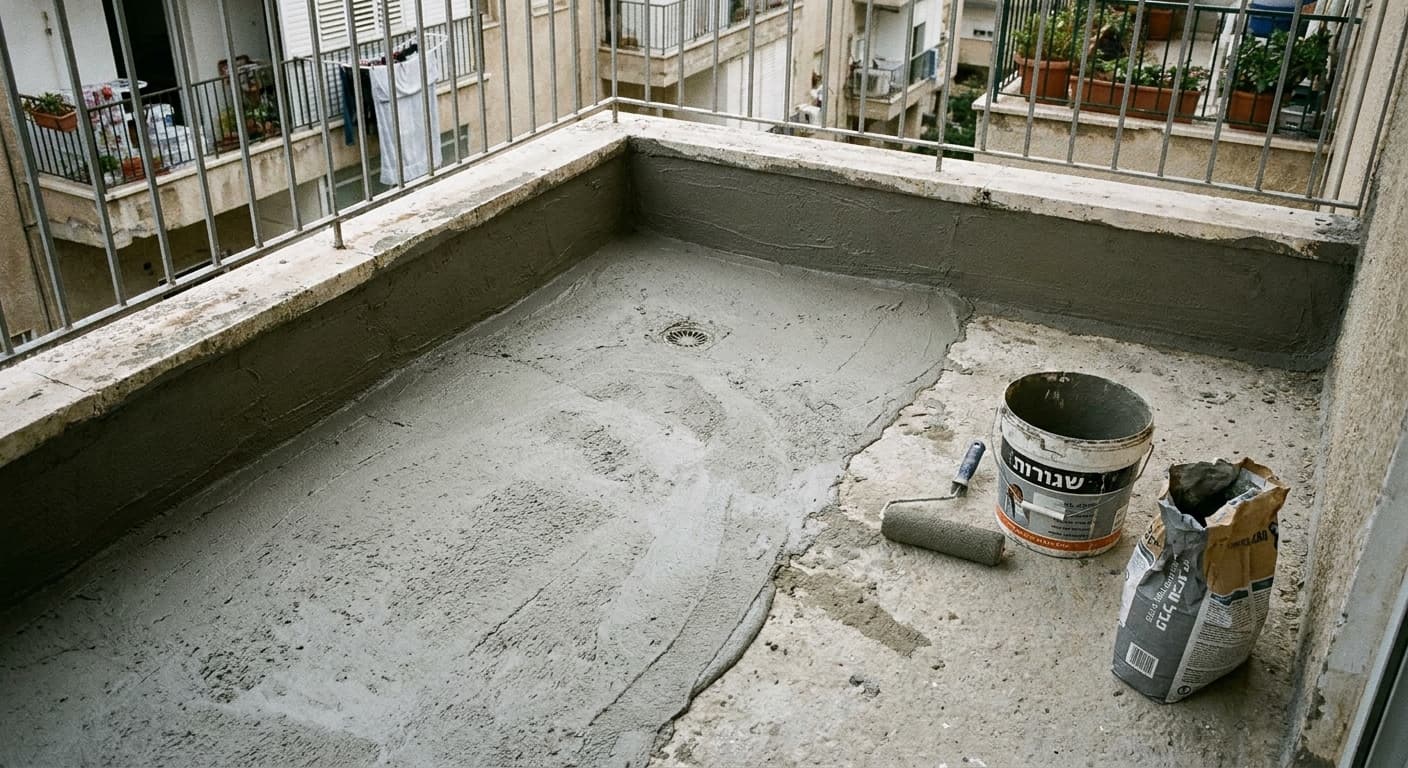
In winter a balcony takes everything at once: rain falling directly on it, water sitting in puddles, cold at night and heat by day that expand and contract the materials. Any small weakness in the waterproofing that held up through the dry summer opens right when the rain starts, and that is the worst time to find it.
The first sign almost always shows up below, not on the balcony itself: a damp stain on the ceiling of the room underneath, plaster swelling on the adjoining wall, or a leak into the neighbor's flat. By the time the stain reaches inside, the water has already passed through the tiles, found the crack in the waterproofing, and soaked into the concrete. The longer you wait, the further it spreads from the entry point.
The key thing to understand: balcony waterproofing is a system, not a single layer. A slope that leads water to the drain, a drip edge that throws the runoff clear of the wall, a cove that carries the waterproofing from floor to wall with no sharp corner, and drains and railings sealed at their connection points. If one of these is missing, the rest won't save the balcony. For us, waterproofing and tiling are the core of the job, with a transparent BOQ and a written warranty on wet work. This is what we check before winter arrives.
01Why a balcony leaks specifically in winter
An exterior balcony works in harsher conditions than any wet room in the home. In summer the tile and waterproofing heat up and expand, on winter nights they contract, and that repeated movement pulls on every seam and every corner. At the same time, prolonged rain creates a continuous water load that probes for any opening, while in a bathroom the wetting is local and temporary.
The result is that a failure that went unnoticed all summer surfaces the moment water arrives in volume. A thin crack in the cove, a broken drip edge, or a drain the waterproofing isn't correctly connected to, all stay hidden until the first serious rain. So the inspection and repair happen before the season, not during it.
Watch out
A stain that appears on the ceiling of the room below a balcony after the first rain is almost always a waterproofing failure in the balcony above, not a local ceiling problem. Painting the ceiling from inside fixes nothing, the source stays outside.
02Slope: water has to flow to the drain, not stand
A flat balcony is a problem. The balcony floor should lead all the water to the drain point with a gentle, continuous slope, so no puddles remain standing after rain. When the slope is reversed, too flat, or wavy with local dips, the water stops, sits on the tile for hours, and looks for a way inside through the grout and through any weakness in the waterproofing.
Standing water is a balcony's main enemy. It doesn't just accelerate wear on the grout and waterproofing, it sits long enough to seep through. A correct slope is set as early as the screed stage under the tile, checked with a level, and planned so every point on the floor leads to the drain, per the manufacturer's instructions and the Israeli standard for waterproofing exterior surfaces.
If the balcony is already tiled with the wrong slope, you can sometimes fix it without a full tear-out, but when the reversed slope is in the screed base itself it usually has to be removed and rebuilt. That's why it's better to check this before investing in expensive tiling.
Field tip
A simple home check: pour a bucket of water at the far end of the balcony from the drain. The water should flow to the drain and disappear without leaving a puddle. Water that stops in place, or runs toward the wall, points to a faulty slope to handle before winter.
03Drip edge: throws runoff clear of the wall and the floor below
A drip edge is a groove or profile at the outer edge of the balcony, under the projecting floor, whose job is to break the flow of water. When rain runs to the edge of the balcony, without a drip edge it keeps clinging to the underside of the concrete and creeps back toward the wall, the facade, and the window frame of the floor below. A proper drip edge makes the water drip straight down instead of spreading backward.
Many damp and black stains on a building's facade, under balconies, actually come from a drip edge that's missing, clogged or broken. It's a point that's easy to miss because it's on the underside of the balcony and you don't see it from above, but it protects both the structure and the floor below.
When treating a balcony before winter, we check that there's a drip edge along the entire outer edge, that it's clean and not clogged with paint or plaster, and that it isn't broken. On an old balcony with no drip edge, one can be formed as part of the renovation.
04Cove fillet: a continuous transition from floor to wall
The junction between the balcony floor and the wall or railing is a right-angle corner, and it's the spot most prone to leaking. A waterproofing layer trying to cross a sharp corner stretches, cracks and pulls away from the substrate right there, because it has no continuous surface to grip. All the water running across the floor reaches this line in the end.
The fix is a cove fillet, a small rounded angle formed at the wall-to-floor junction before waterproofing, so the membrane runs continuously from floor to wall with no sharp corner. That gives you a sealed, flexible transition that doesn't crack as the structure moves with temperature changes. The waterproofing has to rise up the wall and the railing base to a height that stops water from getting in behind the tile.
On a balcony, the connection to the railing base is especially critical, because that's where water collects and looks for a way into the wall. A proper cove along the whole junction line, including behind the railing, is what prevents the stain that shows up on the inner wall on the other side.
Watch out
When the cove is skipped, the waterproofing can look perfectly fine to the eye but fail along the line where the floor meets the wall or the railing. That's the hardest place to locate once the balcony is tiled.
05Drains and penetrations: every hole is a weak point
The balcony's sealed envelope is continuous only up to the point where something penetrates it: the drain collar, pipe penetrations, the anchor points of the railing and an awning. Each such hole needs dedicated sealing. The drain is the most critical, because all the water on the balcony reaches it in the end, and if the waterproofing isn't correctly connected to the drain body, water seeps under the waterproofing instead of draining through it.
A clogged drain is a separate and no less dangerous problem. Leaves, sand and dirt collect in the drain over the year, and in winter, during heavy rain, a blocked drain makes the water rise and flood the balcony above the waterproofing height. So cleaning the drains is part of preparing for the season, not just the waterproofing itself.
The railing's anchor points are a leak source that's easy to forget. Bolts drilled into the floor or wall penetrate the waterproofing layer, and if they aren't sealed around, they lead water straight into the concrete. Every such anchor needs spot sealing.
- A drain collar connected and sealed to the waterproofing layer, not just sitting next to it
- Drains open and clean before the season, with no leaves or sand blocking the flow
- Spot sealing around every anchor bolt for a railing, awning or laundry line
- A dedicated sleeve or gasket at every pipe penetration through the floor or wall
06Tile and grout: protection over the waterproofing, not a substitute for it
A common mistake is assuming the tile itself waterproofs. The tile and grout are the finish and mechanical protection over the waterproofing, they don't block water on their own. Cracked or missing grout, a tile that has lifted, or grout material that isn't suited to the outdoors, all give water a fast path down to the waterproofing layer beneath.
On an exterior balcony the grout suffers more than in an indoor room, because of the sun, the cold and the movement. So we check it before winter: grout that crumbles or cracks is refilled with a material suited to the outdoors, and a tile that sounds hollow when you tap it, a sign it has separated from the substrate, is dealt with before water gets under it.
It's important to remember that fixing grout alone does not fix failed waterproofing beneath it. If the source is in the waterproofing layer, refilling the grout buys time but won't solve it. So we find first where the water actually gets in, then decide whether local grout repair is enough or the waterproofing needs work.
07The right order of work before the season
All these components work together only if they're done in the right order. First we locate the leak source, if there already is one, and check the slope, the drains, the drip edge, the railing and the grout. Then we know whether it's a local repair or a re-waterproofing of the surface.
When re-waterproofing is needed, the order is: fixing the slope in the screed if needed, forming a cove along all the junction lines, dedicated sealing of the drains and anchor points, and then the waterproofing layer over the whole surface including its rise up the wall and railing base. Only after the waterproofing has dried per the manufacturer's times, and where possible after a documented water test, do we tile back.
All of this is done before the first rain, not while it's already leaking. Waterproofing and screed need drying time per the manufacturer's instructions, and you can't waterproof a wet surface in the middle of a storm. A balcony treated at the end of summer or the start of autumn goes into winter ready, instead of becoming an emergency call in the middle of a downpour.
Field tip
If you see a sign of damp on the ceiling below a balcony, don't wait for next season. Every additional rain widens the damage to the concrete and neighboring spaces, and the repair only gets more expensive the longer you wait.
Official sources
A balcony before winter? Let's check it in time
A site visit, a check of the slope, drains, drip edge and cove, and a transparent BOQ with a written warranty on wet work. Before the rain, not during it.
Site visit & quote